Suitable Surfaces:
- Non-woven wallpaper works well on various substrates, including:
- Interior plaster
- Plasterboard
- Concrete panels
- Wallpaper underlay
- Chipboard
- They are particularly effective for walls with cracks, providing stability to sensitive surfaces like soft fiberboards.
Surface Preparation:
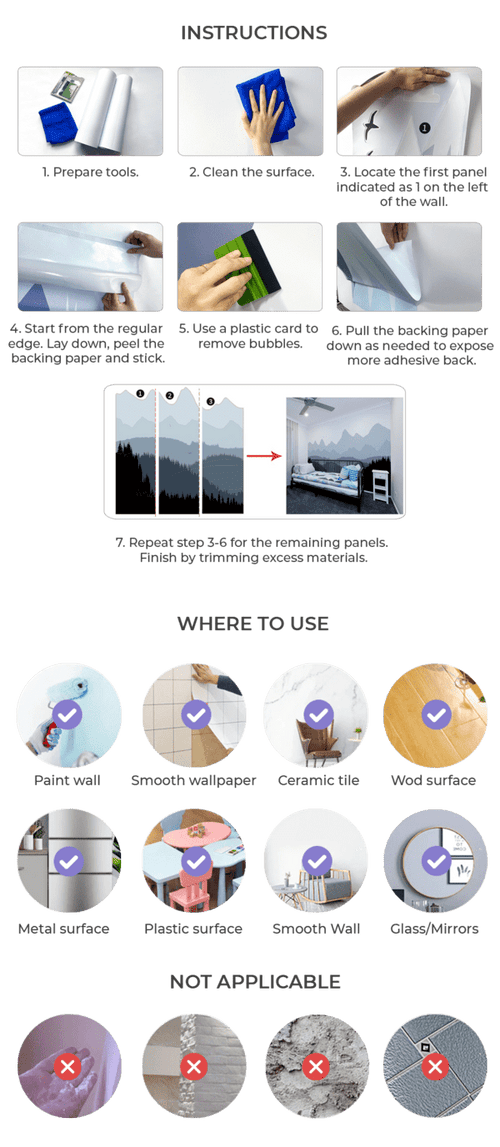
- Cleaning: Thoroughly clean the walls to remove dirt, dust, and cobwebs.
- Unevenness: Address any unevenness with leveling compound for a smooth application.
- Existing Wallpaper/Paint: Remove old wallpaper and water-soluble paint.
Priming:
- Ensure the substrate is dry and firm before gluing.
- Prime fresh plaster, plasterboards, and any absorbent surfaces using the wallpaper adhesive according to the manufacturer's instructions.
- Avoid gluing to damp surfaces.
Color Consistency:
- If the substrate has a significantly different color or pattern, consider priming it with a primer that matches the wallpaper. This ensures a consistent look even if the wallpaper is repainted in the future.
Necessary tools:
- Non-woven wallpaper: Choose enough rolls to cover your project area.
- Wallpaper adhesive: Use a special adhesive specifically formulated for non-woven wallpapers.
- Utility knife: For trimming the wallpaper.
- Straightedge: To guide your cuts with the knife.
- Smoothing tool: A plastic wallpaper smoother or a clean, damp cloth for smoothing out air bubbles.
- Level and plumb line: To ensure a straight application of the wallpaper strips.
- Pencil: For marking lines and the top of the wallpaper.
- Paint roller and tray (optional): For applying the adhesive to the wall (depending on the manufacturer's instructions).
- Sponge or damp cloth: For cleaning up excess adhesive.
- Stepladder (optional): For reaching high areas.
Cutting the Wallpaper:
- Calculate the strip length by adding the room height to 5 centimeters (0.05 m) to allow for trimming at the top and bottom.
- If your wallpaper has a pattern, ensure each roll follows the pattern repeat for seamless matching.
- Mark the top of the wallpaper strip with a pencil to prevent it from flipping during gluing.
Hanging the Wallpaper:
- Starting Point: Begin hanging the first strip from a window and work your way towards the door.
- Plumb Line: Use a plumb bob to mark a vertical line on the wall as a guide for a straight application.
- Seams: Aim for butt joins (placing edges together) for a seamless look. Overlapping is only recommended in corners or problem areas.
- Electrical Safety: Turn off the electricity before gluing around outlets and switches. Unscrew the covers, apply the wallpaper, cut openings for the outlets/switches, and then reattach the covers.
- Window Recesses: Allow the wallpaper to overhang the window recesses and then trim it precisely with a knife and straightedge.
- Radiators: For radiators, simply fold the wallpaper back 10-15 centimeters.
- Ceilings: Work in pairs when gluing wallpaper on ceilings.
Applying the Adhesive:
- Follow the manufacturer's instructions on whether to apply the adhesive to the wall or directly to the back of the wallpaper.
- Use a paint roller (if applicable) to spread the adhesive evenly on the designated surface.
Hanging the Strips:
- Roll the dry non-woven wallpaper strips face inwards.
- Place the rolled wallpaper onto the adhesive-coated wall.
- Unroll the wallpaper strip gradually while pressing it firmly onto the wall with a rubber roller.
- Use a sharp knife and straightedge to trim off any excess wallpaper at the bottom.
Cleaning Up:
- Immediately remove any excess adhesive with a clean, damp cloth.
Borders (Optional):
- Use a pencil and ruler to mark the placement of the border on the dry wallpaper.
By following these comprehensive steps and using your supplier's specific instructions for their wallpaper and adhesive, you can achieve a professional-looking finish with your non-woven wallpaper project.








Share and get 15% off!
Simply share this product on one of the following social networks and you will unlock 15% off!